Gel/Gelli Plate Printmaking: Step-by-Step Guide
Welcome to the Gel Plate Printmaking instructional guide! Follow these simple steps to create prints using this experimental technique.
Materials You'll Need:
Gel Plate Supplies | These are the materials that I use (after lots of experimentation)
🌟Gelli Brand plate
🌟Amsterdam, Liquitex and Golden Paints (in that order of how much I use them)
🌟Brayer (rollie thing)
🌟Bristol 205 gr
🌟Baby Oil
🌟Laser Print or High-Quality Magazines (Vogue)
🚀 Optional Supplies 🚀
🌟Plexiglas for storage and to see underneath while reverse painting
🌟Gel Medium for thinning acrylic paint and for transfer layers
🌟Paint Brushes and Palette Knives
Have fun and experiment 💃
Step by Step Tutorial for Laser Printed Photos and Magazines
Step 1: Prepare Your Workspace
Set up a clean and organized workspace. Place your Gelli plate on a flat surface with ample room to work comfortably.
Step 2: Apply Paint
Squeeze a small amount of acrylic paint onto the Gelli plate. Use a soft brayer to spread the paint evenly, creating a thin layer. Experiment with multiple colors for dynamic effects.
Step 3: Add Laser Printed Photo or Magazine Transfer
Lay the laser print or magazine image face down on the acrylic paint while it is wet. Press gently with your hands or roll gently with a brayer. Lift the laser photo or magazine right away while the paint is still wet and see the image remain on the plate.
Laser Print Tips:
I edit my photos in Adobe Photoshop but you can use free apps like Snapseed.
- Edit your photos first: High-resolution images work best.
- Halftone: Experiment with using halftone, which prints in dots. This is helpful to get gradients.
- Toner: The Toner repels the acrylic paint. So the more toner, typically the better your image transfer will be.
- CMYK: Understanding CMYK colors is key for great prints. Using all four—cyan, magenta, yellow, and black—instead of just black can enhance your image transfer, even if you only print a black-and-white photo since it lays more toner.
- Double Print: I run the photo through the laser printer 2x to lay down more toner on the paper. This helps most of the time but it really depends on the photo.
- Will only Laser Prints work? Inkjet uses ink whereas laser printers use toner. The toner works better for this because it has some sort of plastic that repels the acrylic paint, unlike the ink in inkjets.
Step 4: Layer and Blend (Reverse Image Painting)
Once the transfer layer is dry, layer more colors on top of the initial layer or use stencils to add patterns. Use the brayer to gently blend colors and create interesting combinations.
Step 5: Transfer to Paper
Carefully place a sheet of Bristol paper onto the Gelli plate, making sure it makes full contact with the paint. Press gently or stack with books to transfer the paint onto the paper. Let sit for 20 min or until full dry
Step 6: Reveal Your Print
Peel the paper off the Gelli plate to reveal your unique print. Each print will have its own characteristics due to the hand-printing process and the nature of the Gelli plate. If it is tearing or not fully transferred, let it dry longer.
Step 7: Experiment and Repeat
Experiment with different colors, textures, and tools to create a series of prints. Allow each layer to dry before adding another to prevent smudging.
Troubleshooting Tips:
- Paint Consistency: If the paint is too thick, it might result in uneven prints. Thin it with a bit of water.
- Unwanted Smudges: Handle the paper carefully while lifting it from the Gelli plate to avoid smudging.
Remember, Gelli plate printmaking is all about exploration. Embrace the imperfections and enjoy the process of creating one-of-a-kind prints. Happy printing!
Is it Science or Magic?
It all feels a bit like magic but there is science behind it all.
The science behind image transfers with Gelli plates lies in the principles of adhesion and pressure. When a medium, such as acrylic paint, is applied to the Gelli plate, it adheres to the surface due to its adhesive properties.
The application of pressure with a brayer, ensures that when an image source (like a laser print or magazine page) is pressed onto the painted plate. The acrylic paint bonds with the magazine or laser print in the areas where there is no toner. The remaining acrylic paint stays on the gel plate. Gelli plates are made from a soft, gel-like substance that allows for a temporary bond with the paint and the image source.
Let that layer dry.
Then you can paint on other layers. Letting them dry in between.
The final layer needs to cover the entire plate and you need to add paper, like bristol. The acrylic paint adheres to the paper and releases from the gel plate as it dries. It needs to be fully dry before you peel it off the gel plate.
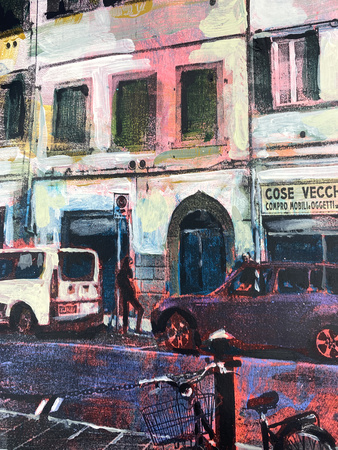
Cose Vecchie Bicicleta-
20x25cm
Monotype 2023
Signed
This artwork represents the first place I called home in Florence, Italy. Memories, like all recollections, tend to be a bit distorted. Some aspects stand out vividly, while others gradually fade into fragmented pieces. In this monotype, you'll sense a vibrant and painterly atmosphere, achieved through a lively color palette that still captures the essence of Piazza Dei Ciompi in Florence.
This piece speaks to the resilience of places, their ability to adapt to changing times, and how the past converges with the present in a burst of lively hues. The monotype process adds depth and enriches the painterly quality, making the transformation visually captivating. My goal is to blend memory and a sense of place in my creations. To see how I craft these monotypes, check out my process on TikTok @bluelavaart.